

CCTV camera placement: where to put cameras on a business site, how high, and what each one must see
Good CCTV camera placement starts with what each camera is for: detecting that someone is there, observing what they do, recognising them, or identifying them. Each job needs the person to fill a different share of the screen, so place cameras at pinch points such as entrances and gates for faces, look along fence lines and side passages rather than across them, mount high enough to be out of reach without losing the face, keep bright light behind the camera rather than behind the subject, and check every view at night, in low sun and in summer foliage. Keep views off neighbours and public space you do not need, put signs up before people reach the camera, and check placement again whenever the site changes.

Last updated 2 November 2026. Most CCTV systems on business sites in the UK were put up in a hurry. A camera on each corner of the building, one over the front door, one on a pole by the gate, all pointed roughly where the installer could reach with a ladder on the day. The system records around the clock, and for months nobody looks at it. Then something happens, the footage is pulled, and it turns out that the person who climbed the fence is a grey smudge in the corner of a wide shot, the face at the door is hidden under a hood because the camera looks almost straight down, and the gate camera shows nothing but the glare of headlights.
The cameras were working. They were simply in the wrong places, pointed the wrong way, or asked to do a job they could never do from where they were. Placement is the cheapest part of a CCTV system to get right and the most expensive to get wrong, because you only find out when it matters.
This guide is for owners, managers, facilities teams and installers of business sites in the UK: industrial units, yards, warehouses, depots, workshops, shops and offices. It covers how to decide what each camera is for, how big a person needs to be on screen, what pixel density means and how the standard changed in 2025, where to put cameras on entrances, gates, fences, passages and yards, how high to mount them and which way to point them, lighting, glare and infrared, weather and the seasons, tampering, privacy and the law, and what changes when the cameras feed AI detection of people and smoke.
It is general guidance. It is not a substitute for a survey of your own site by a competent installer, or for advice from your insurer, the police or a data protection adviser. If you are choosing a whole new system rather than placing cameras, see our guide to choosing an AI CCTV system.
Why does CCTV camera placement matter so much?
A camera can only record what is in front of it, at the size and in the light it has. No amount of recording quality afterwards can recover a face that was never in the frame, or a person who was three pixels tall. The Home Office, in its guidance for small businesses, says plainly that one of the most common failings it sees in CCTV systems is image sizes that are too small. The others it lists are just as much about placement: cameras set too high, views obscured by stock or signs, views that are too wide, and subjects strongly lit from behind.
Businesses do have reason to care. In the Home Office Commercial Victimisation Survey for 2023, a quarter of business premises in England and Wales in the sectors surveyed had experienced at least one crime in the previous year. The survey also found that the measures businesses most often mentioned for preventing crime were about monitoring the premises and stopping people getting in while they were closed: security lighting, CCTV, gates and fences outside, and locks and alarms within.
Of the victims in that survey, 55% reported the latest incident to the police. When they do, the first thing anyone asks for is the footage, and the first thing that decides whether it helps is where the camera was. If you are reviewing a system after a burglary, our guide to commercial burglary prevention covers the wider measures; this guide is about the cameras.
Placement matters even more when cameras are expected to raise alerts, not just record. A person who walks through the corner of a wide view for two seconds can be missed by a human operator and by software alike. Smoke that rises behind a stack the camera cannot see over will not be spotted until it is above the stack. A camera that faces the road will see every passing car. Getting the views right first makes everything that follows work better.
Why start with what each camera is for?
The single most useful piece of advice in the Home Office guidance is also the simplest: do not install a camera for one purpose and expect to use it for another. A camera placed to show the whole yard will not identify the person in it. A camera placed to identify faces at the door will not show what is happening at the back fence. Each camera should have a job, written down, before anyone decides where it goes.
The Home Office CCTV Operational Requirements Manual, published in 2009 by the Home Office Scientific Development Branch, sets out how to do this. It asks you to define the problem, the activity you want to see, where and when it happens, and what you need the image to show. Secured by Design, the police crime prevention initiative, says the same in its Commercial Guide 2023: an operational requirement should be drawn up before a system is designed.
The manual describes the jobs in terms of what an observer needs to do with the picture:
- Monitor and control. Watch the flow of people or vehicles over a wide area, such as a car park, without needing to pick out individuals.
- Detect. Tell with reasonable certainty whether a person is present at all, for example at the far fence at night.
- Observe. See what a person or group is doing, and some detail of their clothing, in the context of what is around them.
- Recognise. Tell with a high degree of certainty whether someone is a person you have seen before, such as a member of staff or a known visitor.
- Identify. Show a person in enough detail to establish their identity beyond reasonable doubt.
Most business sites need a mix. Detect and observe across the yard, the fence line and the car park, where the question is whether anyone is there and what they are doing. Recognise or identify at the few places everyone must pass: the main door, reception, the pedestrian gate. Writing the job down for each camera turns a vague wish to cover everything into a short list of views that can each be checked.
It also sets the limits of what a camera will deliver. A detect view across a 60-metre yard is a good view if it shows reliably that someone is there. It is not a failure because it does not show their face. That is the job of a different camera, at a different place.
How big does a person need to be on screen?
The Operational Requirements Manual expresses each job as a target: how much of the screen height a standing person should take up. These are targets for what should normally be achievable, not minimum standards, and the manual is clear that lighting, angle and image quality matter as well as size.
- Monitor and control: at least 5% of the screen height.
- Detect: at least 10%.
- Observe: 25 to 30%.
- Recognise: at least 50%.
- Identify: at least 100%, so the person fills the screen from head to foot.
The Home Office small business guidance gives the same rule of thumb for a figure about 1.7 metres tall: about 25% of the screen for a general view of what is happening, about 50% to recognise someone, and about 100% to identify them. In practice that means a camera covering a doorway for identification has a much tighter, closer view than people expect. A person walking through a frame that shows the whole front of a building will be nowhere near half the screen tall.
These percentages were written in the days of analogue cameras and 4:3 screens. The manual itself notes that with megapixel cameras the percentages no longer translate directly, because a higher-resolution camera can show the same person at a smaller share of the screen with more detail. It includes conversion tables for digital resolutions, and the more modern way of expressing the same idea is pixel density.
What is pixel density, and what changed in 2025?
Pixel density is the number of pixels the camera puts across each metre of the scene, at the distance where the subject is. It is usually written as pixels per metre, or px/m. The arithmetic is simple: divide the number of pixels across the image by the width of the scene, in metres, at that distance. A camera 2,560 pixels wide looking at a scene 20 metres across gives 128 px/m. The same camera looking at a scene 40 metres across gives 64 px/m.
For years, the international standard for video surveillance systems, IEC 62676-4 (published in the UK as BS EN 62676-4), defined the familiar levels in pixels per metre. Under the 2014 edition, detect was 25 px/m, observe 62.5 px/m, recognise 125 px/m and identify 250 px/m, with higher levels for inspection. Installers and manufacturers often call these the DORI levels: detect, observe, recognise, identify.
In October 2025 the IEC published a second edition of IEC 62676-4. Its foreword says it cancels and replaces the first edition published in 2014, and that one of the significant technical changes is a complete redefinition of the pixel densities. The previous scale of 12.5, 25, 62.5, 125, 250 and 1,000 px/m has been replaced by seven densities: 20, 40, 80, 125, 250, 500 and 1,500 px/m. The new edition also adds clauses on the site survey and on illumination.
What does that mean for you? First, if a specification, quote or survey talks about DORI or pixel density, check which edition of the standard it is using, because the numbers have changed. Second, the principle has not changed at all: work out what each camera needs to do, then make sure the subject will be at a high enough pixel density, in the light that will actually be there, for that job. Third, Secured by Design recommends that systems are installed to BS EN 62676, so a competent installer should be working to the current edition.
One caution. These levels describe what a person looking at the image can be expected to do. Software detection, such as AI that spots people or smoke, has its own needs, which depend on the system and on the scene. Neither the Home Office targets nor the IEC levels are a specification for AI. The honest way to know whether a view works for detection is to try it on that view, at night and by day, which is what a site assessment and a live test on your cameras are for.
How far can a CCTV camera see?
This is one of the most searched questions about CCTV, and the honest answer is that it depends on what you need to see. Any camera can see a long way in the sense of showing something at the far end of the yard. The question is whether a person at that distance will be large enough, and lit well enough, for the job the camera is meant to do.
Pixel density makes the trade-off easy to see. Take a camera 2,560 pixels wide. With a wide lens covering about 90 degrees, the scene is roughly twice as wide as it is far away. At 10 metres the scene is about 20 metres wide and the density is about 128 px/m. At 20 metres it is about 64 px/m. At 40 metres it is about 32 px/m. At 60 metres it is about 21 px/m.
With a narrower lens of about 40 degrees, the same camera gives roughly 352 px/m at 10 metres, 176 at 20 metres, 88 at 40 metres and 59 at 60 metres. The narrow view sees much further in detail, but covers a much smaller area: at 20 metres it is only about 15 metres wide.
That is the core decision in placing any camera. You can see a wide area with less detail, or a small area with more. A higher-resolution camera moves the line, but it does not remove it, and at night the usable detail is often lower than the pixel count suggests because the camera is working with very little light. For large yards, the answer is usually more cameras with narrower views, each closer to the area it covers, rather than one camera trying to cover everything.
Rules of thumb such as "this camera sees 30 metres" are not much use without the job and the lens. When you are told how far a camera can see, ask: at what pixel density, for which job, with which lens, and in what light?
How do you plan camera positions on a site?
Start with a plan of the site, even a rough sketch. The Operational Requirements Manual recommends marking up a site plan with the areas you want covered, the job for each one, the fields of view you expect, and any environmental problems, such as low sun or foliage. It also reminds you that CCTV is only one option alongside lighting, barriers, intruder alarms and the design of the site itself.
Then think like someone who wants to get in. Walk the site from the outside in, at the times when it is empty. Where would you approach? Where are the gates, the gaps in the hedge, the low walls, the side passage that cannot be seen from the road? Where would you go once inside: the stores, the vans, the stacks of metal, the fuel tank, the back door? Which routes would you use to get there and out again?
Mark those routes and places on the plan. A good camera layout follows them. It covers the points where people must pass, such as gates, doors and the ends of passages, and the places they are heading for, such as stores and yards. It does not need to cover every square metre of the site equally, and trying to will spread the cameras too thinly.
For each position, write down:
- what the camera is for (detect, observe, recognise or identify, or smoke);
- the area it must cover and the distance to the far edge of that area;
- when it matters most (opening hours, nights, weekends, all the time);
- the light it will have at those times, including any lights you plan to add;
- anything that could block it, such as trees, stacks, parked vehicles or signs;
- what it must not see, such as neighbouring homes or more of the public road than you need.
That list is the brief for the installer, and it is what you check the finished views against.
Where should CCTV cameras go on a business site?
Every site is different, but the same places come up on almost every survey. Secured by Design says normal practice is to observe all vehicular and pedestrian entrances. The Home Office small business guidance says at least one camera should give identifiable images of everyone who enters, usually at the main doorway, and points to pinch points where people have to pass close to a camera.
A typical list for an industrial unit or a small yard looks like this (for gates, roads and shared boundaries across a whole estate, see our industrial estate security guide):
- The main entrance and reception, for faces of everyone coming in during the day.
- Every vehicle and pedestrian gate, for who and what comes and goes, and anyone climbing over at night.
- The fence line and boundary, especially stretches out of sight of the road.
- Side passages and the sides of buildings, which are the usual route from the front to the back.
- The rear yard, with its stacks, skips, pallets, containers and anything of value.
- Fire exits, roller shutter doors and back doors, where break-ins often start.
- Stores, cages and tanks, such as gas cages, fuel tanks and material bays.
- The car park, for vehicles and people moving between them.
- Routes onto the roof, such as low roofs, bin stores against a wall, or fixed ladders.
Inside the building, the same thinking applies to the shop floor, the stockroom, the till or office, and any high-value store. But the rest of this guide focuses on the outside of business sites, where most break-ins start and where cameras are hardest to place well.
How should you place cameras on entrances and doors?
The entrance is the one place on most sites where you can count on getting a good view of a face, because everyone has to pass through a small space, usually walking towards the camera. It is where an identify view earns its keep.
- Use the pinch point. Place the camera where people have to pass close to it, such as just inside the door, the reception desk, or a gate in a fence. The view can then be tight enough for a face to fill a good share of it.
- Mind the height. The Operational Requirements Manual notes that if the purpose is identification, the camera should be near head height, and that cameras mounted on ceilings can miss the face. Caps and hoods make a steep angle worse still. There is a balance with keeping the camera out of reach, which we come to below.
- Watch the light. The same manual describes cameras facing out of entrances as a key failing: daylight coming through the door turns everyone into a silhouette. Where you can, place the camera outside looking in, or inside but at an angle, so the light falls on faces rather than behind them.
- Leave clear space. The manual also advises leaving clear space above people's heads in the frame, so a taller person is not cut off at the top of the picture.
A second camera giving a wider view of the same entrance from further back is often useful. It shows what the person did before and after the close-up, where they came from and which way they went.
How should you place cameras on gates?
Gates are where vehicles and people come and go by day, and where intruders often climb at night. A gate camera usually has two jobs: to observe who and what comes through during opening hours, and to detect anyone at or over the gate when it is locked.
- Mount it inside the boundary. A camera inside the yard, looking across the gate, is harder to reach from outside and sees people as they come over or through.
- Make the gate a good share of the view. If the gate is a thin strip at the edge of a wide yard shot, someone climbing it will be small and quick to pass.
- Avoid looking straight down the road. Headlights shining into the lens at night can wash out the picture, and a view down the road records far more of the public highway than you need.
- Light the gate. Secured by Design recommends external lighting for entrance gates and routes to the main entrance and doors when a building is unoccupied.
- Cover every gate. Pedestrian gates and the second vehicle gate at the back are often forgotten, and they are exactly the ones that are used when the main gate is watched.
If you want a record of vehicles entering by day, that is an observe job for the gate camera. Woodcock AI detects vehicles moving in a zone; it does not read number plates.
How do you cover a fence line or boundary?
The most common mistake on a boundary is pointing the camera across the fence, outwards, at the road or the field beyond. A camera facing across a fence sees a person for only a few steps as they cross the frame. It also sees everything happening on the other side: traffic, passers-by, trees and other people's property.
A better approach is to look along the fence, from a corner, so a person approaching or climbing it stays in view for longer and the far side is a narrow strip rather than half the picture. Where a stretch is long, two cameras facing each other from opposite ends cover the area below each camera that the other one can see, which also means each camera is watched by the other.
Keep the camera on the inside of the fence, high enough not to be easily reached, and keep a clear strip along the inside of the fence free of stacked materials, skips and vehicles, both so the camera can see it and so nobody can use them to climb. Trees and hedges along a boundary need to be kept back from the view, or they will block it in summer and move in the wind all year.
Our guide to perimeter intrusion detection covers fences, gates and detection along a boundary in more depth.
How do you cover the sides and rear of a building?
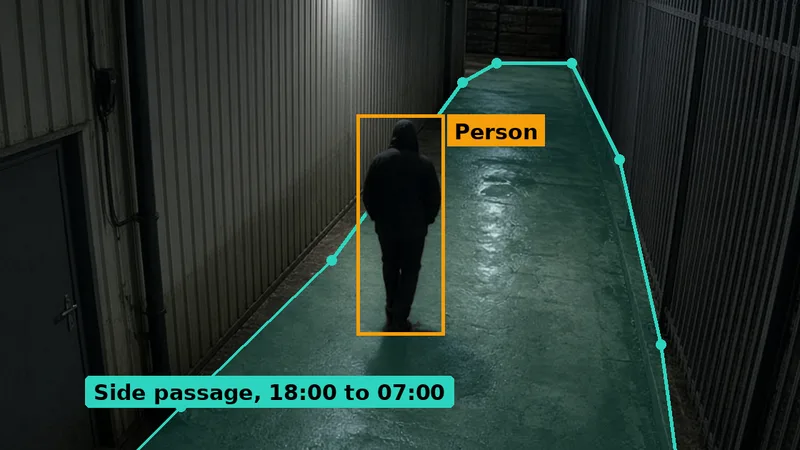
The side passage between a building and its boundary fence is one of the most important views on many sites. It is usually the route from the public front to the private back, it is often out of sight of the road and the neighbours, and it is where a camera placed well can see anyone heading to the rear yard for the whole length of the passage.
Mount the camera on the corner of the building, high up, looking straight down the passage, as in the image at the top of this page. A person walking along it then moves towards or away from the camera through the whole view, rather than crossing it in a moment. Make sure there is nothing under the camera, such as a bin, a wall or a pallet, that would let someone reach it.
At the rear, think about fire exits, roller shutter doors and back doors, which are where many break-ins are attempted, and about routes onto the roof: low flat roofs, bin stores or containers against a wall, and fixed ladders. A camera above and to one side of a door can see both the door and the ground in front of it. A camera that looks too closely at the door alone will miss someone standing to one side with a tool.
Plant and services at the back of a building matter as well: gas cages, fuel and oil tanks, meter cabinets, air conditioning units and generators. They attract thieves and, sometimes, arsonists.
How do you cover yards, stacks and storage areas?
Yards are where many businesses keep the things that are most at risk: stacks of pallets, timber, scrap, tyres, packaging and waste, skips, containers, vans and materials waiting to be used. They are also where fires start out of hours, often against a fence or a wall.
- Go high on the building. A camera high on the rear wall can see over the first row of stacks to the ones behind. A camera at fence height sees the side of the nearest stack and nothing else.
- Keep the aisles in view. People move along the gaps between stacks. A view that sees down an aisle is worth more than one that sees across the tops.
- Leave sky above the stacks. If you want cameras to show smoke early, the view needs some space above the stacks and against the fence where smoke will rise. A view cropped tightly to the tops of the stacks will only show smoke once it is already large.
- Plan for change. The Operational Requirements Manual warns that new signs and structures can block a field of view. In a yard, the stacks themselves are the structures, and they change height every week. Agree stacking limits that keep views clear, and check the cameras when the layout changes.
For large open yards, one camera on the corner of the building is rarely enough. A person standing by the far fence, 50 or 60 metres away, will be a few pixels tall on a wide view. That may be enough to detect that someone is there, but it is nowhere near enough to recognise them or see what they are doing. Use two or more cameras, each with a narrower view, so every corner is covered by a camera that is reasonably close to it.
What does good placement look like in different parts of a site?
Each part of a site asks something different of a camera. Choose an area to see how a camera might be placed there, and what a well-placed view looks like at night.
Which part of the site are you placing cameras for?
For smoke, the camera has to see the whole of each stack and some clear space above it, because smoke shows first as it rises. Mount it high on the building so the stacks do not hide each other, and keep the lens clean. A people zone over the same yard can be armed when the site is closed.
Stacks, skips, pallets and the back fence
Mount the camera inside the boundary, looking across the gate, with the gate taking up a good share of the frame and a light on it at night. A line across the gate, armed out of hours, flags anyone climbing over or coming through, and the same view can record who comes and goes by day.
Vehicle gates, pedestrian gates and the approach
One very wide camera can show that someone is in a large yard, but at 50 or 60 metres a person is only a few pixels tall. Split big areas between two or more cameras, each with a narrower view, so the far corners are covered by a camera that is nearer to them.
Wide yards, back fences and far corners
Each area gets views chosen for its job: smoke over the stacks, people across the gate, and nearer cameras for the far corners.
How high should CCTV cameras be mounted?
There is no single right height. The Operational Requirements Manual sets out the balance: it may be advisable to put a camera above head height to make vandalism less likely, but that can compromise the view, make facial identification harder and make regular cleaning and maintenance awkward. Add one practical point of our own: a higher camera sees over parked vans, stacks and fences that would block a lower one.
For views whose job is to detect or observe, such as the yard, the fence line, the passage and the car park, higher is usually better, as long as the camera is firmly fixed and the area is not so far away that people become too small. These cameras are about seeing the whole area and seeing over things, and a steep-ish angle does them little harm.
For views whose job is to recognise or identify, height works against you. The manual says that where identification is the main priority, the camera should be at head height, because ceiling-mounted cameras may not give a full view of the face. The usual answer is to keep the identify camera at a pinch point where people walk towards it, at a height that is out of easy reach but not looking almost straight down, often inside the entrance where it is protected, and to protect it with a robust housing.
Practical points that affect height:
- Reach. Check whether anything below or near the camera, such as a wall, a bin, a skip, a fence or a parked vehicle, would let someone reach it.
- Stability. The manual notes that cameras should be fixed firmly so they do not wobble in the breeze, which is a particular problem on tall poles.
- Maintenance. A camera that can only be reached with a cherry picker will not be cleaned or re-aimed as often as it should be. Plan how it will be reached.
- Power and data. The manual lists power and cabling as part of the placement decision. A camera has to be placed where it can be connected, but it should be placed for the view first, not for the ease of installation.
What angle should a CCTV camera point at?
The angle decides what share of the picture is useful. A camera tilted too steeply shows the top of everyone's head and the ground at their feet. A camera tilted too shallowly shows a lot of sky, distant buildings and the road beyond the boundary, and sets its exposure by the brightest part of the picture, so the yard you care about comes out darker.
As a rule of thumb, frame the view on the ground you care about, with only a little of the background above it, and point the camera along the route people will take rather than straight down onto it. The Home Office small business guidance includes worked failures that are almost all about angle: a camera set too high, a view obscured, a view too wide, and a subject strongly backlit.
Angle also matters for how long someone stays in view. Someone walking towards or away from a camera stays in the picture for the whole length of the view. Someone walking across it is gone in a few steps. That is why passages, fence lines and approaches are best covered by cameras that look along them.
Should you use a wide or a narrow field of view?
Field of view is the other half of the distance question. A wide lens shows more of the site and makes each person smaller. A narrow lens shows less and makes each person larger. A varifocal lens can be adjusted at installation to suit the job, which is useful when the right view is not obvious until the camera is up.
Pan-tilt-zoom cameras can be steered and zoomed, which is useful for an operator watching a large site live. But the Operational Requirements Manual points out that a pan-tilt-zoom camera can only cover a small area at a time, and while it is zoomed in on one corner it is not watching the rest. For unattended sites, especially out of hours, fixed cameras with fixed views are usually a better basis, with pan-tilt-zoom added where someone will actually use it.
Wide views have another cost at night. The wider the view, the more of it is dark, the more of it is lit by a single floodlight, and the more of the picture is spent on areas that do not matter. A narrower view placed closer to the area it covers is often brighter, sharper and more useful.
How does lighting affect where cameras go?
Light is the one thing a camera cannot do without, and it changes completely between noon in June and midnight in December. The Operational Requirements Manual gives a sense of the range: bright sunlight can reach about 100,000 lux, a bright office is about 400 lux, and a full moon gives about 0.25 lux. It notes that 3 lux is generally considered the minimum for security purposes, although most modern cameras work well below that, and that colour and detail fall away as light drops.
For placement, that means a view that looks perfect on the day of installation can be close to useless at night. Every camera that matters out of hours should be checked in the dark, with the site's real lighting on, before anyone signs it off.

The manual recommends that the contrast in an artificially lit scene should be no more than about 3:1 between the brightest and darkest areas. A single bright floodlight on a dark yard is the opposite: a pool of glare with deep shadow around it, which is hard for cameras and for people. Several lower, well-aimed lights giving even coverage usually work far better than one powerful one.
Secured by Design says lighting should be co-ordinated with any CCTV installation, with the landscaping designed to avoid conflicts, so that the lighting is sufficient to support the cameras. It asks for uniform lighting levels with good colour rendition that do not cause glare or light pollution. It also notes that low bollard lighting is purely for wayfinding and does not light faces. The type of light matters too: the manual notes that low-pressure sodium lighting, the old orange street lighting, loses nearly all colour information.
How do you avoid glare, backlight and low sun?
The most common lighting problem in CCTV placement is not darkness but light in the wrong place. A camera facing a bright doorway, a window, the low sun, a floodlight or oncoming headlights sets itself for the brightest part of the picture, and everything else turns dark.
- Doorways and windows. The Operational Requirements Manual names cameras facing out of entrances as a key failing. Daylight outside the door makes people coming in appear as dark shapes.
- Low sun. The manual warns about daily and seasonal changes in light, especially low sun in winter mornings and evenings, which can shine straight into a lens that faces east or west. A lens hood can help, and it can be worth checking the angle of the sun at different times of year.
- Floodlights in the frame. A camera that has a floodlight in its view, or one mounted beside a light so insects and rain are lit up in front of the lens, will struggle at night.
- Headlights. Gate cameras that look down the access road see headlights coming straight at them. The manual notes that headlights, and sunlight reflected off windows or water, can cause flare. Turn the view so it looks across the gate.
Modern cameras have features meant to handle a mix of bright and dark areas, but they are a help, not a cure. The cheapest fix is almost always to move or re-aim the camera so the brightest light is behind it or to the side.
Should cameras use infrared or white light at night?
Most business cameras have built-in infrared, which lets them see in the dark by lighting the scene with light the human eye cannot see. The picture switches to black and white. It works well up to the range of the infrared, and it does not disturb neighbours. But it has limits: the range is short compared with a good floodlight, the scene loses colour, and anything close to the camera, such as a wall, a gutter, a spider's web or falling rain, can reflect the infrared and wash out or clutter the picture.
The Operational Requirements Manual suggests that, where possible, increasing ambient light is preferable to relying on infrared. White light gives colour, makes the site look watched, and helps people as well as cameras. The manual also notes that floodlights can be intrusive, and the law on light nuisance is covered below. Many sites end up with a mix: white light on the gate, the entrance and the main yard, and infrared on the quieter views such as the far fence and the side passages.
Whichever you choose, place the camera so its infrared or the nearest light does not bounce straight back off something close to the lens, and check every view at night, in rain if you can.
What about weather, foliage and the seasons?
A view checked on a dry day in March can look very different in July and December. The Operational Requirements Manual lists seasonal change among the things to consider when placing a camera: the growth of foliage between winter and summer, the low winter sun, and protection from driving rain.
- Foliage. Trees and hedges that are bare when the camera goes up can fill the view by June. Secured by Design says landscaping must be maintained so that it does not blind CCTV or obscure lighting. Agree who cuts back what, and how often.
- Rain. A camera facing into the prevailing weather collects water on its lens, which blurs the picture and catches the light at night. A little shelter from an eave or a hood helps.
- Wind. Cameras on tall poles and long brackets can sway. The manual says they should be fixed firmly so they do not wobble in the breeze. A view that moves is harder for people to watch and for any software to use.
- Insects and webs. Spiders build webs across lenses, especially near lights, and a web lit by infrared can fill the picture. Regular cleaning is part of good placement.
How do you protect cameras from tampering?
A camera that can be reached can be turned, covered, sprayed or pulled off the wall. Placement is the first defence.
- Out of reach. Mount cameras high enough, and away from anything that could be climbed, that they cannot be reached without a ladder.
- Robust housings. Secured by Design recommends vandal-resistant housings for CCTV in high-crime areas.
- Protected cabling. Cables should run in conduit or inside the building, not hang loose where they can be cut.
- Cameras that watch cameras. Place cameras so each one is in the view of another, so anyone tampering with one is recorded by the next.
Ask your installer whether the system can alert when a camera is covered, moved or loses its picture, and make sure someone will see that alert.
How many cameras does a business site need?
Count cameras from the plan, not from the corners of the building. List the views you need, the job for each one, and the distances involved. The number of cameras is whatever it takes to cover those views at the right size, in the light available. On a small unit that might be four or five. On a large yard with several gates, it might be twenty or more.
Two principles help. First, overlap. Each view should start where the last one ends, so someone walking from the gate to the rear yard is never out of sight, and each camera should be visible to at least one other. Second, depth. For the places that matter most, such as the main entrance or the store with the most valuable stock, a wide view showing the area and a close view showing faces are better together than either alone.
It is also worth listing what you will not cover, and why. Not every corner needs a camera, and spreading cameras evenly over a site gives you lots of views that are each a little too far away to be useful.
Where should CCTV cameras not point?
Placement is a privacy decision as well as a security one. Under UK GDPR, CCTV that captures identifiable people is processing personal data, and the Information Commissioner's Office says both fixed and mobile cameras should be focussed on a relevant space, with wider surveillance restricted where it is possible but unnecessary.
The ICO gives a simple example. A café installs a camera on its entrance after break-ins in the area. On review, the owner realises the camera's field of view also captures a nearby flat and can see into it, so the owner adjusts the view to the café entrance only. The same thinking applies to any business site:
- Neighbours. Keep views off neighbouring homes, gardens and windows. If a camera has to look along a shared boundary, frame it on your side of the fence.
- Public space. Some of the street or footpath is often unavoidable at a gate or front door. Keep it to what you need, and avoid cameras that look straight down the road.
- Staff areas. Cameras should not cover toilets, changing rooms or areas where people would reasonably expect privacy. Think carefully, and take advice, before covering rest areas or desks.
- Masking. Many systems can black out part of a view, such as a neighbour's window. Masking helps, but it is better to aim the camera so the area is not in view in the first place.
The way a camera records matters as well as where it points. In Fairhurst v Woodard, decided at Oxford County Court in 2021, a judge found that a homeowner's video doorbell and cameras, one on a shed covering almost the whole of a neighbour's garden and her parking space, had processed the neighbour's personal data unlawfully. The judge found the audio recording even more problematic than the video, and noted that switching off detection in one zone did not stop the camera filming across its whole field of view when movement elsewhere set it off. It was a domestic case, but the lesson for placement is general: aim and frame the camera so it does not see what it should not, rather than relying on settings to ignore it.
Signs. The ICO says an effective way to tell people about surveillance is to place signs prominently before the entrance to the camera's field of view, and to reinforce them inside the area, so people know about the cameras before they are recorded. Put signs at the gate and the entrance, not just on the wall under the camera. They should say who runs the system, why, and how to get in touch.
Our guide to AI CCTV and GDPR in the UK covers lawful basis, signs, retention, subject access requests and impact assessments in detail.
What rules apply to where business cameras go?
There is no law that tells a business exactly where to put its cameras. But several sets of rules shape the decision.
- UK GDPR and the Data Protection Act 2018. A clear purpose for the cameras, no more surveillance than that purpose needs, signs, security of the footage, and keeping it for no longer than necessary. The ICO guidance on video surveillance explains what this means in practice, and says a data protection impact assessment is needed for high-risk processing.
- The Surveillance Camera Code of Practice. Issued under the Protection of Freedoms Act 2012 and updated in 2022, it sets out 12 guiding principles, starting with a specified purpose in pursuit of a legitimate aim and a pressing need. Relevant authorities, such as the police and local councils, must have regard to it. Other operators, including businesses, are encouraged to adopt it voluntarily, and its principles are a useful checklist for placement.
- Light nuisance. Under section 79 of the Environmental Protection Act 1990, artificial light emitted from premises so as to be prejudicial to health or a nuisance can be a statutory nuisance. Floodlights added to support cameras should be aimed down and into the site, not at neighbours' windows or the road. The Institution of Lighting Professionals publishes guidance on reducing obtrusive light.
- Planning and landlords. Cameras on a listed building, a conservation area, or tall poles can need permission, and many leases control what can be fixed to the outside of a building. Check before you drill.
- Standards and insurers. Secured by Design recommends installation to BS EN 62676. Your insurer may have its own requirements for cameras, alarms and response. If police response to a monitored system matters to you, the National Police Chiefs' Council publishes requirements for security systems.
What else should a camera survey check?
Placement is not only about where the camera points. A few other things decide whether the footage is usable on the day.
- The clock. The Home Office small business guidance says the system clock should be set correctly and kept accurate, taking account of GMT and BST, because it will be very important if there is a police investigation.
- Retention. The same guidance recommends a minimum of 14 days for small CCTV systems. Keep footage only as long as you need it for your purpose, which the ICO also expects.
- Export. Make sure someone on site knows how to find and export footage quickly, in a format the police can use.
- Maintenance. The Operational Requirements Manual lists cleaning, repairs and checks that each camera is still fit for purpose, still in position and still in focus. A camera knocked a few degrees by a ladder or the wind can miss the gate it was put up to watch.
How does camera placement affect AI detection?
AI detection on CCTV looks at the picture from each camera and decides whether there is a person, a vehicle, smoke or flame in it. It can watch every camera at once, all night, which no person can. But it can only work with the view it is given. The same placement mistakes that frustrate a person reviewing footage also make detection harder.
- Size. A person in the far corner of a very wide view may be too small to pick out reliably, by a person or by software. Placing cameras nearer to the areas they cover helps both.
- Light. At night, detection depends on the light or infrared reaching the area. A zone drawn over the dark end of the yard, beyond the reach of the infrared, will not see much.
- Steadiness. A camera that sways on a pole, or a pan-tilt-zoom camera that moves on a tour, changes the view under the zones drawn on it. Fixed cameras on firm mounts suit detection best.
- A clear view of each zone. If a stack, a parked van or a hedge sits between the camera and the area you care about, nothing behind it can be detected.
Placement also decides what you can draw. With a well-placed view of the yard, a polygon zone can follow the ground you care about exactly and leave out the footpath beyond the fence. With a camera that looks across the gate, a line can be drawn over it. With a camera looking along the side passage, a zone can cover the passage from end to end. A camera pointed at the road, by contrast, leaves you drawing zones around traffic.
Woodcock AI does not set minimum pixel figures for each view; it depends on the scene. Instead, each view is checked during a site assessment or a live test on your cameras, by day and at night, and any camera that would benefit from being moved, re-aimed or lit is pointed out.
How can AI on existing CCTV help?
Recording-only CCTV shows what happened after the event. AI detection tells someone while it is happening, in time to act. Woodcock AI connects to the IP cameras and recorders a site already has, over RTSP or ONVIF, including Hikvision, and runs on an edge server on site or on a cloud server (an edge server needs only a power socket and a network connection). Many existing cameras, placed well, can be used as they are.
- Smoke and flame. Smoke and flame detection on the cameras that see yards, stacks, skips and stores, around the clock, indoors and out.
- Polygon zones. Draw an area of any shape on each camera's view, such as the passage, the yard or the stores, and detect people only inside it.
- Lines. Draw a line across a gate or along the inside of a fence, and alert when a person crosses it in the direction you choose.
- People and vehicles. Detect people and detect vehicles moving in a zone, ignoring foxes, birds, rain and swaying branches.
- Schedules. Arm each people rule for the hours when nobody should be there, and leave smoke detection on all the time.
- Alerts with the clip. Alerts arrive in the app and by email with a short clip and an AI description, so whoever receives them can see in seconds what has happened.
The system is self-learning. It learns each camera, what is normal on that view and what is not, and marking an alert as correct or false feeds into retraining for your site. Woodcock AI has been in development for years and is now running on customer sites across the UK.
Woodcock AI does not read number plates or identify people. It tells you that there is a person in the side passage at 23:48, or smoke by the back fence at 02:31, with the clip; what happens next is up to you.
Coming next: Ask your cameras Coming soon, early 2027, which will let you ask the system questions about what your cameras have seen.
For an introduction to how this kind of system works, see what is AI CCTV.
How should cameras be placed to see smoke and fire?
Fires in buildings other than homes are not rare. In the year ending June 2026, fire and rescue services in England attended 13,111 fires in other buildings, such as shops, offices, factories and warehouses, and the average response time to these fires was 9 minutes and 14 seconds. Many outdoor fires on business sites start in yards, skips, stacks and bin stores, often at night when nobody is there to see them.
Video smoke detection sees smoke where it appears in the picture, so placement for smoke is a little different from placement for people.
- See the whole risk. Each stack, skip, bin store or cage you are worried about should be fully in at least one camera's view, not cut off at the edge.
- See above it. Smoke rises. A view with some clear space above the stack, against a wall, a fence or the sky, shows smoke as soon as it lifts. A view cropped tight to the top of the stack shows it later.
- Keep the view steady. A camera that shakes or a view that moves makes smoke harder to see.
- Keep the lens clean. Grime, condensation and webs on a lens can look like haze and hide real smoke.
- Think about the background. Steam from vents, dust from a road and spray from a jet wash all move like smoke. Where you can, keep them out of the view or at its edge.
Our guides to outdoor fire detection and video smoke detection on existing CCTV cover this in more depth.
Which camera position suits which job?
The table pulls the guide together: the main positions on a business site, the job each one usually does, how to place it, and what to watch out for.
| Position | Main job | How to place it | Watch out for |
|---|---|---|---|
| Main entrance or reception door | Identify everyone coming in | At a pinch point, close in, as near head height as is safe, facing in from outside the light | Facing out into daylight; a steep angle that shows only hoods and caps |
| Vehicle and pedestrian gates | Detect and observe who comes and goes | Inside the boundary, looking across the gate, with a light on it | Headlights shining into the lens; the gate too small in a wide view |
| Fence line and boundary | Detect someone at or over the fence | Along the fence, ideally two cameras facing each other | Looking across the fence at a road; trees and bushes in the view |
| Side passages | Detect anyone heading to the rear | On the corner, looking straight down the passage | Bins or ladders under the camera that help someone reach it |
| Rear yard, stacks and skips | Detect people out of hours; see smoke | High on the building, with each stack and the sky above it in view | Stacks growing to block the view; floodlights in the frame |
| Fire exits and roller doors | Detect someone at the door at night | Above and to one side, so the door and the ground in front are both visible | A view so close that someone standing to the side is missed |
| Car park | Observe people and vehicles | High, covering the bays and the walkways between them | Recording more of the road and neighbours than you need |
| Large open yard | Detect someone anywhere in it | Several narrower views rather than one very wide one | Far corners where people are only a few pixels tall |
How does good placement cut false alerts?
Many false alerts are placement problems in disguise. A camera that sees the road alerts on traffic. A camera with a tree in the corner of the view alerts when the wind blows. A camera facing a floodlight sees moths and rain lit up in front of the lens.
- Keep traffic out. Aim cameras so roads and public footpaths are at the edge of the view, not across the middle of it.
- Keep branches out of zones. Cut back what you can, and draw zones so swaying vegetation is outside them.
- Avoid glare. Do not point cameras at floodlights, low sun or headlights.
- Draw tight zones. Cover the ground that matters, not everything in the picture.
- Mark alerts. Mark each one as correct or false so the system learns each view.
Our guide to reducing CCTV false alarms covers schedules, zones and settings in more detail.
What detection schedule suits a business site?
Placement decides where detection can work; the schedule decides when. A common pattern is people rules where and when nobody should be there, and smoke detection on everything, all the time.
In this example, the business closes at 18:00. The side passage and the rear yard are armed for people from 18:00 to 07:00, and the gate line from 19:00, after the last delivery, until 06:30. At weekends and holidays the people rules stay on for the whole closure. Smoke detection never switches off. Start with a cautious schedule, look at the alerts for a fortnight, and adjust. Our out-of-hours site security checklist covers locking up for nights, weekends and holidays.
What should happen when an alert comes in?
An alert is only useful if someone acts on it. Before the cameras go live, agree who receives alerts for each area, at what hours, and what they do.
- Alert. The alert arrives in the app and by email with the clip and an AI description.
- Check. Watch the clip. Is it a fox, a member of staff working late, a person in the yard, or smoke?
- Act. Follow the plan: call the keyholder or a monitoring centre, call 999 if a crime is in progress or there is a fire, and never put anyone at risk by sending them to confront an intruder alone.
- Review. Mark the alert, and if a view or zone caused a false alert, fix it.
How do you check an existing camera layout?
Most businesses are not starting from scratch. They have cameras already, and the question is whether those cameras are in the right places. A simple review takes a few hours and costs nothing but time.
- Purpose. For each camera, write down what it is for. If nobody knows, that is the first finding.
- Plan. Mark each camera and its view on a site plan. Look for gaps along the routes people would take, and for areas covered twice by views that are too wide.
- Size. Have someone walk through each view, at the far edge and at the near edge, and look at how big they are on the recorded footage, not just the live picture.
- Light. Repeat the walk at night with the site's lights as they are, and on a sunny winter morning or evening if you can.
- Privacy. Check what each camera sees beyond your boundary, and that signs are where people will see them before they are recorded.
- Test and review. If cameras feed detection, watch the alerts for a fortnight and adjust views, zones and lights.
What are the most common CCTV placement mistakes?
The Home Office small business guidance, the Operational Requirements Manual and almost every installer will give you a similar list.
- Images too small for the job, usually because one camera is trying to cover too much.
- Cameras set too high, or tilted too steeply, to show faces.
- Views blocked by stock, stacks, signs, vehicles or trees, often ones that arrived after installation.
- Cameras facing into daylight, low sun, floodlights or headlights.
- Cameras looking across fences at the road instead of along the boundary.
- Cameras placed where they were easy to fit, not where the view was best.
- Cameras within reach of a bin, a wall or a fence.
- Views that see into neighbours' homes and gardens.
- No check at night, and no check after the site changes.
- A clock that is an hour out because nobody changed it for BST.
How do you get started?
Start with the site plan and the purpose of each camera, then look at what you already have. Often the right answer is to move or re-aim a few cameras, add one or two closer views and some lighting, and only then think about what else the system needs.
If you want to know whether your existing cameras could also raise alerts for people and smoke, there are three ways to find out:
- Book a site assessment. We look at the cameras covering your gates, fences, passages and yards, check each view by day and at night, and suggest where zones, lines and schedules would go, and which cameras would be better moved or lit.
- A live test on your cameras. We connect two or three of your own cameras for about a fortnight, so you see real alerts on your own views.
- An on-site demo. We show the system working and the app, with your team, at your site.
Installers adding AI detection to their customers' systems can see our guide for installers.
What are the limits?
Good placement makes cameras far more useful, but it does not make them all-seeing. A camera cannot see through walls, stacks or fog, and at night it can only see as far as the light allows. A well-placed camera is still only part of security: fences, gates, locks, lighting, alarms and a response plan all matter, and the Operational Requirements Manual itself treats CCTV as one option among several.
The figures in this guide are general. The Home Office targets and the IEC pixel densities describe what a person looking at an image can usually do, and the worked distance example is arithmetic, not a measurement of any camera. Real results depend on the camera, the lens, the light, the weather and the scene. That is why every view should be checked on site, by day and at night.
Woodcock AI detects people, vehicles, smoke and flame in the views it is given. It does not read number plates or identify people, it does not replace a fire alarm or an intruder alarm, and it needs each camera to have a clear view, power, a network connection, and enough light or infrared at night.
Sources
- Home Office Centre for Applied Science and Technology, CCTV Operational Requirements Manual 2009, including section 4.3.10, camera placement.
- Home Office, CCTV: Getting the most out of your system, guidance for small businesses (CAST 37/10).
- International Electrotechnical Commission, IEC 62676-4:2025, Video surveillance systems for use in security applications, Part 4: Application guidelines (edition 2.0, preview pages).
- Information Commissioner’s Office, Guidance on video surveillance, including CCTV: complying with the data protection principles.
- Home Office, Amended Surveillance Camera Code of Practice (2022).
- Secured by Design, Commercial Guide 2023, sections on CCTV and external lighting.
- legislation.gov.uk, Environmental Protection Act 1990, section 79.
- Institution of Lighting Professionals, Guidance Note 1 for the reduction of obtrusive light (2021).
- Home Office, Crime against businesses: findings from the 2023 Commercial Victimisation Survey.
- GOV.UK, Fire and rescue incident statistics: England, year ending June 2026.
- National Police Chiefs’ Council, Police Operational Advice and Security Industry Requirements for Response to Security Systems (2024).
- Courts and Tribunals Judiciary, Fairhurst v Woodard, judgment (Oxford County Court, 2021), and BBC News, report of the judgment (October 2021).
We have summarised these sources in our own words. Always read the current versions in full. This page is general guidance, not legal, data protection, insurance or security advice; your installer, your insurer, the ICO and a solicitor can advise on your own site.
Are your cameras in the right places?
Book a site assessment and we will look at the cameras covering your gates, fences, passages and yards, check each view by day and at night, and show where people zones, lines and smoke detection would work, or ask for a live test on your cameras.
Related pages
Frequently asked questions
Where should CCTV cameras be placed on a business site?
Start with the purpose of each camera, then cover the places people must pass: vehicle and pedestrian gates, entrances and fire exits, side passages, the perimeter and the yard. Use closer views at pinch points where you need to recognise or identify people, and wider views to see what is happening across the site. Mark every camera and its view on a site plan, and check each one by day and at night.
How high should a CCTV camera be?
High enough to be out of easy reach, but not so high that it looks down on the tops of heads. The Home Office manual says that where identification is the main priority, a camera at head height gives the best view of the face, while a camera above head height is harder to tamper with but can compromise the view. Many sites compromise with cameras at around 2.5 to 3.5 metres, with a gentle downward tilt, and closer cameras at doors and pinch points.
How much of the screen should a person fill?
Home Office guidance gives targets for a standing person on screen: around 5% to monitor, 10% to detect, 25% to observe, 50% to recognise someone you know and 100% to identify a stranger. The IEC 62676-4 standard expresses the same idea in pixels per metre at the target. The narrower the lens and the closer the camera, the larger a person appears.
Can a business camera point at a neighbour’s property or the street?
Business CCTV should be focussed on a relevant space, and the ICO says wider surveillance should be restricted where it is unnecessary. Some of a public footpath or road can be hard to avoid at a gate or front door, but views into neighbours’ homes and gardens should be avoided or masked, and signs should be placed before people enter the camera’s view.
Should cameras face into or away from the light?
Away from it, wherever you can. Cameras facing low sun, floodlights, bright doorways or headlights lose detail, faces become silhouettes and flare washes out the picture. Place lights so they fall on the area the camera sees, from behind or beside the camera, and add a lens hood where low winter sun is a problem.
Does AI detection need cameras placed differently?
Mostly it needs the same good placement a person reviewing footage needs: views steady on firm mounts, areas of interest in clear sight, enough light or infrared at night, and people large enough in the picture. Woodcock AI connects to existing IP cameras over RTSP or ONVIF, including Hikvision, and runs on an edge server on site or on a cloud server; each view is checked during a site assessment or a live test on your cameras.
Last reviewed 2 November 2026